In this post im gonna explain, how to add a pure CSS3 image galley for blogger. It include nice hover effect. In this gallery, there have 9 images.Each images have own style. You can check it by demo link. you can use this gallery on your sidebar.You can get my earlier images post by clicking here.
Demo
1. Log in to blogger account and Click drop down.
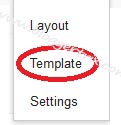
2. Now select "Template" Like Below.
3. Now you can see Live on blog, Click EDIT HTML Button"
4. Now click Proceed button.
5. Find this tag by using Ctrl+F ]]></b:skin>
6. Paste below code Before ]]></b:skin> tag
7. Go to blogger and click Layout
8. Click Add Gadget and select 'HTML/Javascript
9. Paste below code.
10. Now save your HTML/Javascript'.
You are done...
2. Now select "Template" Like Below.
3. Now you can see Live on blog, Click EDIT HTML Button"
4. Now click Proceed button.
5. Find this tag by using Ctrl+F ]]></b:skin>
6. Paste below code Before ]]></b:skin> tag
/* The CSS3 image gallery bloggertrix.com */
.photos {
    width: 300px;
    height: 300px;
    margin: 100px auto;
    position:relative;}
.photos > div {
    background-color: rgba(128, 128, 128, 0.5);
    border: 2px solid #444;
    float: left;
    height: 70px;
    margin: 5px;
    overflow: hidden;
    position: relative;
    width: 70px;
    z-index: 1;
    -webkit-border-radius: 10px;
    -moz-border-radius: 10px;
    -ms-border-radius: 10px;
    -o-border-radius: 10px;
    border-radius: 10px;
    -webkit-transform:scale(1.0);
    -moz-transform:scale(1.0);
    -ms-transform:scale(1.0);
    -o-transform:scale(1.0);
    transform:scale(1.0);
    -webkit-transition-duration: 0.5s;
    -moz-transition-duration: 0.5s;
    -ms-transition-duration: 0.5s;
    -o-transition-duration: 0.5s;
    transition-duration: 0.5s;
}
.photos > div img{
    width: 100%;
}
.photos > div:hover{
    z-index: 10;
    -webkit-transform:scale(2.0);
    -moz-transform:scale(2.0);
    -ms-transform:scale(2.0);
    -o-transform:scale(2.0);
    transform:scale(2.0);
}
.photos > div div {
    background: url(https://blogger.googleusercontent.com/img/b/R29vZ2xl/AVvXsEhlq8n1rK8Ou8iC2paYrnQreSwJN5FQ8QNMYZKM7pPp2lbrdc5U-dxhlAZHxphhN4MFBBUExjqxc1q1f8qRu9SGBzf9BNV1CQwxoIG-raYQ264wJfFKyISTY6ojnWXhGvdHBZh1Rq4MK7I/s1600/hover.gif) repeat scroll 0 0 transparent;
    cursor: pointer;
    height: 100px;
    left: 0;
    opacity: 0.7;
    position: absolute;
    top: 0;
    width: 100px;
    z-index: 15;
    -webkit-transition-duration: 1.5s;
    -moz-transition-duration: 1.5s;
    -ms-transition-duration: 1.5s;
    -o-transition-duration: 1.5s;
    transition-duration: 1.5s;
}
.photos > div:nth-child(1):hover div {
    height: 0%;
}
.photos > div:nth-child(2):hover div {
    height: 0%;
    margin-top: 100px;
}
.photos > div:nth-child(3):hover div {
    width: 0%;
}
.photos > div:nth-child(4):hover div {
    margin-left: 100px;
    width: 0%;
}
.photos > div:nth-child(5):hover div {
    height: 0%;
    margin-left: 150px;
    margin-top: 50px;
    width: 0%;
}
.photos > div:nth-child(6):hover div {
    margin-left: 150px;
    width: 0%;
}
.photos > div:nth-child(7):hover div {
    height: 0%;
    margin-left: 150px;
    margin-top: 50px;
    width: 0%;
    -webkit-transform: rotateX(360deg);
    -moz-transform: rotate(360deg);
    -ms-transform: rotate(360deg);
    -o-transform: rotate(-360deg);
    transform: rotate(-360deg);
}
.photos > div:nth-child(8):hover div {
    height: 0%;
    margin-left: 150px;
    margin-top: 50px;
    width: 0%;
    -webkit-transform: rotateZ(600deg);
    -moz-transform: rotateZ(600deg);
    -ms-transform: rotateZ(600deg);
    -o-transform: rotateZ(600deg);
    transform: rotateZ(600deg);
}
.photos > div.pair div {
    width: 100px;
}
.photos > div.pair div:nth-child(odd) {
    margin-left: 100px;
}
.photos > div.pair:hover div {
    width: 0%;
}
.photos > div.pair:hover div:nth-child(odd) {
    margin-left: 100px;
}
7. Go to blogger and click Layout
8. Click Add Gadget and select 'HTML/Javascript
9. Paste below code.
<div class="photos">
            <div>
                <a href="URl link 1" target="blank"><img src="Image URL 1" /></a>
                <div></div></div><div>

                <a href="URl link 2" target="blank"><img src="Image URL 2" /></a>
                <div></div><div></div>

                <a href="URl link 3" target="blank"><img src="Image URL 3" /></a>
                <div></div><div></div>

                <a href="URl link 4" target="blank"><img src="Image URL 4" /></a>
                <div></div><div></div>

                <a href="URl link 5" target="blank"><img src="Image URL 5" /></a>
                <div></div><div></div>

                <a href="URl link 6" target="blank"><img src="Image URL 6" /></a>
                <div></div><div></div>

                <a href="URl link 7" target="blank"><img src="Image URL 7" /></a>
                <div></div><div></div>

                <a href="URl link 8" target="blank"><img src="Image URL 8" /></a>
                <div></div> </div>

                <div class="pair">
                <a href="URl link 9" target="blank"> <img src="Image URL 9" /></a>
                <div></div> <div></div>
            </div>
        </div>
Replace with your URL and Image URL10. Now save your HTML/Javascript'.
You are done...


Great post on css3 transition
ReplyDeleteThat really wow... :). Nice share
ReplyDeleteawesome tips i try this tips css3 to my blogspot and still success
ReplyDelete