In this tutorial im gonna explain how to add jQuery sliding hover style menu bar for blogger. Actually this is a updated version of Apple Style Menubar. For this menu bar im using jQuery and Css. Just check out demo.Its easy to add to blogger get my all menu bar here

1. Log in to blogger account and Click drop down.
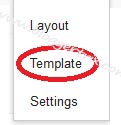
2. Now select "Template" Like Below.
3. Now you can see Live on blog, Click EDIT HTML Button"
4. Now click Proceed button.
5. Find this tag by using Ctrl+F </head>
6. Paste below code Before </head> tag
/* The CSS Code for the menu starts here bloggertrix.com */

<script src='http://bloggertrixcode.googlecode.com/files/jquery-1.2.6.min.js' type='text/javascript'/>
<script src='http://bloggertrixcode.googlecode.com/files/kwicks.js' type='text/javascript'/>
<script src='http://bloggertrixcode.googlecode.com/files/custom.js' type='text/javascript'/>
7. Go to blogger and click Layout
8. Click Add Gadget and select 'HTML/Javascript
9. Paste below code.
<style>
.kwicks {
     list-style: none;
     position: relative;
     margin: 0;
     padding: 0;
     background-image:url(https://blogger.googleusercontent.com/img/b/R29vZ2xl/AVvXsEiDHZLd-JlN647slutr4pARqmvVt5q21-JhyizvE6ez3HfCuiEV3wJw5g2NR2mpO3QidFPVZhi1DurB41Hd1GlZf5xpTOl7-EALAxgLY_OUnTXDR3UEYELXwfIiCjEQBGY6x0uykPgqxww/s1600/btrix_no_flicker.jpg); /*some browsers are to slow when aligning the menu items via jQuery and so the background shines through, this prevents this flickering*/}
 .kwicks li{
    display: block;
    overflow: hidden;
    padding: 0;
    cursor: pointer;
 float: left;
 width: 125px;
 height: 40px;
 margin-right: 0px;
 background-image:url(https://blogger.googleusercontent.com/img/b/R29vZ2xl/AVvXsEiNFtiAHZV5Guz6lbrG5ZhVvdVAw5QdY0qqvW1V_pg4-pXFXMVkacjInDT59OyYhXXvj-ZLxedq071h462qcJsnt46ZLh3sZdNxbCDSqE7B1eHe38ya_fHfjMpa_rcskfWejVcjdWhQ9uU/s1600/btrix_kwicks_sprite.jpg);
 background-repeat:no-repeat;}
.kwicks a{
 display:block;
 height:40px;
 text-indent:-9999px;
 outline:none;}
#kwick1 {
 background-position:0px 0px;}
#kwick2 {
 background-position:-200px 0px;}
#kwick3 {
 background-position:-400px 0px;}
#kwick4 {
 background-position:-600px 0px;}
#kwick1.active, #kwick1:hover {
 background-position: 0 bottom;}
#kwick2.active, #kwick2:hover{
 background-position: -200px bottom;}
#kwick3.active, #kwick3:hover {
 background-position: -400px bottom;}
#kwick4.active, #kwick4:hover {
 background-position: -600px bottom; }
#kwick1 a{
 background-image:url(https://blogger.googleusercontent.com/img/b/R29vZ2xl/AVvXsEh5Ji5LRJpPbicZ0o-O1_LBvMOVBthZFFHzR0zi7xITnt4IkmWFqd-rjDD42qAOo7oQQtJSrXPB1BvhGi-Iy4HITlg7boDbLaYUSRIH7XQJSwm_BjQBaJJseshswEZAhvbjPRiB6COzSl4/s1600/btrix_end.jpg);
 background-repeat:no-repeat;
 background-position: left 0px;}
#kwick1 a:hover{
 background-position: left -80px;}
#kwick4 a{
 background-image:url(https://blogger.googleusercontent.com/img/b/R29vZ2xl/AVvXsEh5Ji5LRJpPbicZ0o-O1_LBvMOVBthZFFHzR0zi7xITnt4IkmWFqd-rjDD42qAOo7oQQtJSrXPB1BvhGi-Iy4HITlg7boDbLaYUSRIH7XQJSwm_BjQBaJJseshswEZAhvbjPRiB6COzSl4/s1600/btrix_end.jpg);
 background-repeat:no-repeat;
 background-position: right -40px;}
#kwick4 a:hover{
 background-position: right -120px;
}
</style>

<ul class="kwicks">
     <li id="kwick1"><a href="#">Home</a></li>
     <li id="kwick2"><a href="#">Contact</a></li>
     <li id="kwick3"><a href="#">Downloads</a></li>
     <li id="kwick4"><a href="http://www.bloggertrix.com/">Search</a></li>
 </ul>
Replace # with your links.10. Now save your HTML/Javascript'.
You are done...


You are right this mistakes are very common done by web designers , and its really important to find out and resolve this mistakes on time. web designing uk
ReplyDeletethanks for share....
ReplyDelete