Monday, May 1, 2017

How To Create Table Of Content Or Sitemap For Blogger

File Under: , 3 comments

Today i will guide you to how to create Table of content or sitemap to blogger easily. Blogger doesn't provide this feature to add your blog.However, we can do it by get help of blogger archive and label. This is very easy to blogger readers to get all of your blogger articles title in one page. All article show according to every category one by one. Those who want to find any article, they can get it easily. That's why Table of content or sitemap are very useful in blogger.

Follow below guideline to How to how to create Table of content or sitemap to blogger with easy steps.

Awesome blogger widgets get it below :
Sitemap-For-Blogger


How To Create Table Of Content Or Sitemap For Blogger Easily


1. Go to Blogger Dashboard > Pages
2. Backup your template
3. Click on New Page
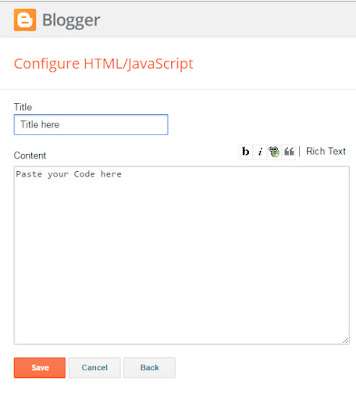
4. Click on  HTML   and paste below code
<style>
p.labels a{color: #242424; text-transform: uppercase;font-size: 15px;}
a.post-titles {color: #0000FF;}
ol li{list-style-type:decimal;line-height:25px;}
</style>
<script>
//<![CDATA[
var postTitle=new Array();var postUrl=new Array();var postPublished=new Array();var postDate=new Array();var postLabels=new Array();var postRecent=new Array();var sortBy="titleasc";var tocLoaded=false;var numChars=250;var postFilter="";var numberfeed=0;function bloggersitemap(a){function b(){if("entry" in a.feed){var d=a.feed.entry.length;numberfeed=d;ii=0;for(var h=0;h<d;h++){var n=a.feed.entry[h];var e=n.title.$t;var m=n.published.$t.substring(0,10);var j;for(var g=0;g<n.link.length;g++){if(n.link[g].rel=="alternate"){j=n.link[g].href;break}}var o="";for(var g=0;g<n.link.length;g++){if(n.link[g].rel=="enclosure"){o=n.link[g].href;break}}var c="";if("category" in n){for(var g=0;g<n.category.length;g++){c=n.category[g].term;var f=c.lastIndexOf(";");if(f!=-1){c=c.substring(0,f)}postLabels[ii]=c;postTitle[ii]=e;postDate[ii]=m;postUrl[ii]=j;postPublished[ii]=o;if(h<10){postRecent[ii]=true}else{postRecent[ii]=false}ii=ii+1}}}}}b();sortBy="titleasc";sortPosts(sortBy);sortlabel();tocLoaded=true;displayToc2();document.write('')}function filterPosts(a){scroll(0,0);postFilter=a;displayToc(postFilter)}function allPosts(){sortlabel();postFilter="";displayToc(postFilter)}function sortPosts(d){function c(e,g){var f=postTitle[e];postTitle[e]=postTitle[g];postTitle[g]=f;var f=postDate[e];postDate[e]=postDate[g];postDate[g]=f;var f=postUrl[e];postUrl[e]=postUrl[g];postUrl[g]=f;var f=postLabels[e];postLabels[e]=postLabels[g];postLabels[g]=f;var f=postPublished[e];postPublished[e]=postPublished[g];postPublished[g]=f;var f=postRecent[e];postRecent[e]=postRecent[g];postRecent[g]=f}for(var b=0;b<postTitle.length-1;b++){for(var a=b+1;a<postTitle.length;a++){if(d=="titleasc"){if(postTitle[b]>postTitle[a]){c(b,a)}}if(d=="titledesc"){if(postTitle[b]<postTitle[a]){c(b,a)}}if(d=="dateoldest"){if(postDate[b]>postDate[a]){c(b,a)}}if(d=="datenewest"){if(postDate[b]<postDate[a]){c(b,a)}}if(d=="orderlabel"){if(postLabels[b]>postLabels[a]){c(b,a)}}}}}function sortlabel(){sortBy="orderlabel";sortPosts(sortBy);var a=0;var b=0;while(b<postTitle.length){temp1=postLabels[b];firsti=a;do{a=a+1}while(postLabels[a]==temp1);b=a;sortPosts2(firsti,a);if(b>postTitle.length){break}}}function sortPosts2(d,c){function e(f,h){var g=postTitle[f];postTitle[f]=postTitle[h];postTitle[h]=g;var g=postDate[f];postDate[f]=postDate[h];postDate[h]=g;var g=postUrl[f];postUrl[f]=postUrl[h];postUrl[h]=g;var g=postLabels[f];postLabels[f]=postLabels[h];postLabels[h]=g;var g=postPublished[f];postPublished[f]=postPublished[h];postPublished[h]=g;var g=postRecent[f];postRecent[f]=postRecent[h];postRecent[h]=g}for(var b=d;b<c-1;b++){for(var a=b+1;a<c;a++){if(postTitle[b]>postTitle[a]){e(b,a)}}}}function displayToc(a){var l=0;var h="";var e="Post Title";var m="Click to sort by title";var d="Date";var k="Click to sort by date";var c="Category";var j="";if(sortBy=="titleasc"){m+=" (descending)";k+=" (newest first)"}if(sortBy=="titledesc"){m+=" (ascending)";k+=" (newest first)"}if(sortBy=="dateoldest"){m+=" (ascending)";k+=" (newest first)"}if(sortBy=="datenewest"){m+=" (ascending)";k+=" (oldest first)"}if(postFilter!=""){j="Click to view all"}h+="<table>";h+="
<tr>";h+='<td class="header1">';h+='<a href="javascript:toggleTitleSort();" title="'+m+'">'+e+"</a>";h+="</td>";h+='<td class="header2">';h+='<a href="javascript:toggleDateSort();" title="'+k+'">'+d+"</a>";h+="</td>";h+='<td class="header3">';h+='<a href="javascript:allPosts();" title="'+j+'">'+c+"</a>";h+="</td>";h+='<td class="header4">';h+="Read all";h+="</td>";h+="</tr>
";for(var g=0;g<postTitle.length;g++){if(a==""){h+='
<tr><td class="entry1"><a href="'+postUrl[g]+'">'+postTitle[g]+'</a></td><td class="entry2">'+postDate[g]+'</td><td class="entry3">'+postLabels[g]+'</td><td class="entry4"><a href="'+postPublished[g]+'">Read</a></td></tr>
';l++}else{z=postLabels[g].lastIndexOf(a);if(z!=-1){h+='
<tr><td class="entry1"><a href="'+postUrl[g]+'">'+postTitle[g]+'</a></td><td class="entry2">'+postDate[g]+'</td><td class="entry3">'+postLabels[g]+'</td><td class="entry4"><a href="'+postPublished[g]+'">Read</a></td></tr>
';l++}}}h+="</table>
";if(l==postTitle.length){var f='<span class="toc-note">Show All '+postTitle.length+" Posts<br/></span>"}else{var f='<span class="toc-note">Show '+l+" posts by category '";f+=postFilter+"' the "+postTitle.length+" Total Posts<br/></span>"}var b=document.getElementById("toc");b.innerHTML=f+h}function displayToc2(){var a=0;var b=0;while(b<postTitle.length){temp1=postLabels[b];document.write("<p/>");document.write('<p class="labels">
<a href="/search/label/'+temp1+'">'+temp1+"</a></p>
<ol>");firsti=a;do{document.write("
<li>");document.write('<a class="post-titles" href="'+postUrl[a]+'">'+postTitle[a]+"</a>");if(postRecent[a]==true){document.write(' - <strong><span style="color: rgb(255, 0, 0);">New!</span></strong>')}document.write("</li>
");a=a+1}while(postLabels[a]==temp1);b=a;document.write("</ol>
");sortPosts2(firsti,a);if(b>postTitle.length){break}}}function toggleTitleSort(){if(sortBy=="titleasc"){sortBy="titledesc"}else{sortBy="titleasc"}sortPosts(sortBy);displayToc(postFilter)}function toggleDateSort(){if(sortBy=="datenewest"){sortBy="dateoldest"}else{sortBy="datenewest"}sortPosts(sortBy);displayToc(postFilter)}function showToc(){if(tocLoaded){displayToc(postFilter);var a=document.getElementById("toclink")}else{alert("Just wait... TOC is loading")}}function hideToc(){var a=document.getElementById("toc");a.innerHTML="";var b=document.getElementById("toclink");b.innerHTML='<a href="#" onclick="scroll(0,0); showToc(); Effect.toggle(\'toc-result\',\'blind\');">?? Display Table of Contents</a> <img src="https://blogger.googleusercontent.com/img/b/R29vZ2xl/AVvXsEhlLC5FR20QRjP77_ETsQt0A4skOBrSO-cFjLcWXAa8odchKkaSOFbHHr2aWrHOPEk-WvwtGUoLN6uK4Cq-KzO5BqCOnxB9iW2z8GdGGzGIWhTJSdAfhgyJD5FaOZ1piGQM0R9EKchoSiVk/s1600/new_icon.gif"/>'}function looptemp2(){for(var a=0;a<numberfeed;a++){document.write("<br>");document.write('Post Link : <a href="'+postUrl[a]+'">'+postTitle[a]+"</a><br>");document.write('Read all : <a href="'+postPublished[a]+'">'+postTitle[a]+"</a><br>");document.write("<br>")}};
//]]>
</script>
<script src="http://bloggertrix.com/feeds/posts/default?max-results=9999&amp;alt=json-in-script&amp;callback=bloggersitemap"></script>

How To Customize Sitemap For Blogger Easily

  • Change http://bloggertrix.com with your blog URL
  • To change font color, change red and purple color code top of the code.
5. Click "Option" on right sidebar and tick comment as "Don't allow, hide existing"
6. Now you are done, Just click on publish button and view the page.

If you have any problem related to how to create Table of content or sitemap to blogger easily. Just leave a comment.I will help you. 

Author Bio: Sohan Jayasinghe is the owner and author of Bloggertrix.com .He has been blogging since 2009 and writing Blogger trix since 2010.If you want to contact him, Just leave a message via contact us page or connect with facebook or twitter
Read More

Monday, February 6, 2017

How To Add an Instagram Widget in a Blogger Blog

File Under: , , 3 comments

Instagram is a most popular picture and photo sharing network application for smartphones.It's also belong to social networking platform like Facebook, Twitter, and Flicker.You can register as a user in Instagram. When you post a photo or video on Instagram, It will display on your profile.So, others can follow you, like on your photos and comment on photos.Same thing also you can do, comment and like other photos. In instagram, there are 200 millions  active users use a month.

Read:  Best blogger Widgets 2017 for Blogger

Adding Instagram widget to blogger, you can get more facilities to your blog. Because it will show your photos in profile pages. When ever you go some where else, you can take a photo and share it on Instagram. There are more filters you can add to photos. This Instagram widget, specially design for blogger and it will show your images on blogger even they are not your follower.

Add-Instagram-Widget-Blogger
By adding this Instagram widget for blogger ,You can increase your follower. Once they visit your blog and if your shared photos are interesting, they will follow you. And you have to share photos according to your blog content,for example if you doing  food  making blog, you can share about foods.It will easy to get more followers in Instagram.

Today, this article will explain, how to add  Instagram widget to your blog site with step by step. By using this blogger widget  you can customize Instagram widget appearance like background color, font color and how to show this widget on blogger.So just follow below steps.

How to Add An Instagram Widget in Blogger


1: You need to visit this site to get Instagram widget  http://www.intagme.com/

2: Type Instagram  username first

3: You can choose slideshow as Widget type

4: Thumbnail Size 100

5: You can select Photo Border  If you want a border to photos

6: You can choose Background Color match to your template color with color picker

7: If you want to add sharing button select Yes
Instagram-Widget-Blogger
      Note: Once yo done, click preview and check your Instagram widget appearance.

8: Once you are done click Get Code and copy it.

9: Now just login to your blogger account https://www.blogger.com

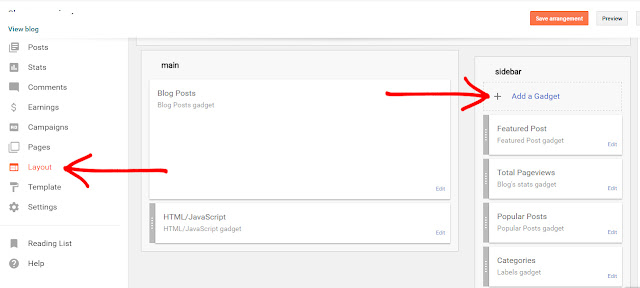
10: Go to layout on left side bar on blogger dashboard

add-Widget-Blogger


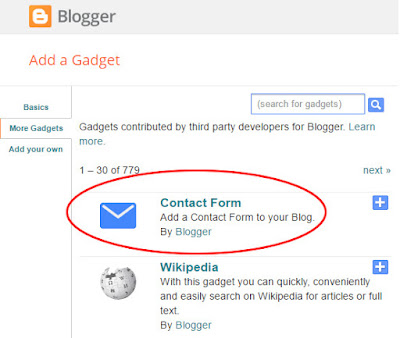
11: Click Add Gadget,  Select HTML/JavaScript gadget on popup window.

add-Widget-Blogger

12: Paste the instagram widget code that you copied from intagme website and click Save


add-Widget-Blogger-instragram
13: Now you can drag the widget where you want to keep and click Save Arrangement

You are done

I hope you added Instagram widget to your blog.Hence, you can share photos and videos as i said above. To change color or appearance of this Instagram widget, you can go that site and edit it as your need.

Read: Best Blogger Gadgets 2017 for Blogger

Once you added Instagram widget to blogger, you can ask your visitors to follow you. Before do it, just make sure to add few photos to your profile and profile photos as well.Then they will get trust about you profile and follow you.

If you have a question about this Instagram widget for blogger gadget, You can comment below. If this article helps you, just spend moment share with Facebook twitter and follow us on Facebook and Twitter
Read More

Thursday, February 2, 2017

How to Add Blogger Contact Form for Blogger Easily

File Under: , , 2 comments

Most of bloggers are using custom blogger contact form. For that they used third party site to get work done. It is bit complex work for beginners. Blogger launched new blogger contact form. So, this official blogger contact form and they provide stranded User interface your this new blogger widget. Therefore we have to apply new css style to make it looks nice.
Blogger contact form is very important because every visitors can contact administrator easily.So, you don't want to share your main email address directly with your blog.

Why you should use a blogger contact form


1. This is the best widget for away from third party blogger contact forms.
2. This widget  developed by blogger and you can trust them than third party blogger contact us forms
3. Blogger Contact us form helps to contact administrator of the blog for some questions,Some business through this. So, this is very excellent way to get connected.
4. Blogger administrator get message immediately to his inbox.
5.If your blog provide some services, visitors can request service or information thought this blogger contact form.

How to add blogger Contact Form for Blogger widget


Before adding this blogger contact form widget. you have to activate it and apply on slidebar

1. Go to blogger.com and sign in first
2. In blogger Dashboard Click Layout on Left side bar
3. Click on ad Add Gadget (any add gadget where you want to add) and select Contact Us From 


blogger-contact-form


4. Now you can save it.

For now, you are successfully added contact form for blogger. Now you need to style your blogger contact form.

How to Add styles to Contact Form For Blogger


1. In Blogger Dashboard Click on Template
2. Now click on Edit HTML and Search  ]]></b:skin>  By (Ctrl + F)
3. Now Paste below code before ]]></b:skin>
/* Contact Form Container  www.bloggertrix.com*/
.contact-form-widget {
width: 500px;
max-width: 100%;
margin: 0 auto;
padding: 10px;
background: #F8F8F8;
color: #000;
border: 1px solid #C1C1C1;
box-shadow: 0 1px 4px rgba(0, 0, 0, 0.25);
border-radius: 10px;
}

/* Fields and submit button */
.contact-form-name, .contact-form-email, .contact-form-email-message {
width: 100%;
max-width: 100%;
margin-bottom: 10px;
}

/* Submit button style */
.contact-form-button-submit {
border-color: #C1C1C1;
background: #E3E3E3;
color: #585858;
width: 20%;
max-width: 20%;
margin-bottom: 10px;
}

/* Submit button on mouseover www.bloggertrix.com */
.contact-form-button-submit:hover{
background: #4C8EF9;
color: #ffffff;
border: 1px solid #FAFAFA;
}
4: Now Save your template. You are successfully done for now.

Your Blogger contact form looks like below

Contact-form-for-blogger

How To Add Contact Form for Blogger Static Pages


You can add this blogger contact form to static page in blogger.This is easy to add to blogger and you can make it as a contact form page. follow these guideline.

1. In Blogger Dashboard Click on Template
2. Now click on Edit HTML and Search  id="ContactForm"  By (Ctrl + F)

blogger-contact-form

3. Now you can see a code like below.

 <b:widget id='ContactForm1' locked='false' title='Contact Form' type='ContactForm'>
    <b:includable id='main'>
  <b:if cond='data:title != &quot;&quot;'>
    <h2 class='title'><data:title/></h2>
  </b:if>
  <div class='contact-form-widget'>
    <div class='form'>
      <form name='contact-form'>
        <p/>
        <data:contactFormNameMsg/>
        <br/>
        <input class='contact-form-name' expr:id='data:widget.instanceId + &quot;_contact-form-name&quot;' name='name' size='30' type='text' value=''/>
        <p/>
        <data:contactFormEmailMsg/> <span style='font-weight: bolder;'>*</span>
        <br/>
        <input class='contact-form-email' expr:id='data:widget.instanceId + &quot;_contact-form-email&quot;' name='email' size='30' type='text' value=''/>
        <p/>
        <data:contactFormMessageMsg/> <span style='font-weight: bolder;'>*</span>
        <br/>
        <textarea class='contact-form-email-message' cols='25' expr:id='data:widget.instanceId + &quot;_contact-form-email-message&quot;' name='email-message' rows='5'/>
        <p/>
        <input class='contact-form-button contact-form-button-submit' expr:id='data:widget.instanceId + &quot;_contact-form-submit&quot;' expr:value='data:contactFormSendMsg' type='button'/>
        <p/>
        <div style='text-align: center; max-width: 222px; width: 100%'>
          <p class='contact-form-error-message' expr:id='data:widget.instanceId + &quot;_contact-form-error-message&quot;'/>
          <p class='contact-form-success-message' expr:id='data:widget.instanceId + &quot;_contact-form-success-message&quot;'/>
        </div>
      </form>
    </div>
  </div>
  <b:include name='quickedit'/>
</b:includable>
  </b:widget>

4. Now just remove the code which i mention with red color
5. Click Save Template button and save your template
6. Now click Pages on blogger dashboard and Click New Page and create a new page
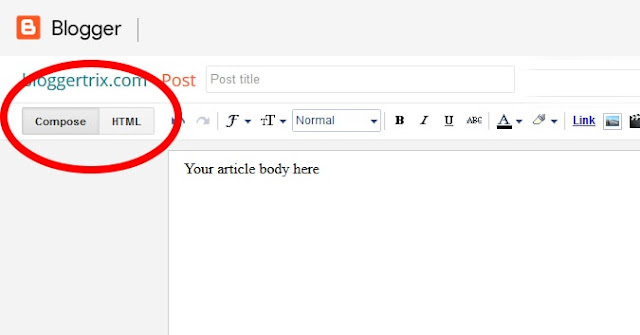
7. Now switch in to HTML composer on left and paste below code.

<div class="widget ContactForm" id="ContactForm1">
<div class="contact-form-widget">
<div class="form">
<form name="contact-form">
Name<br />
<input class="contact-form-name" id="ContactForm1_contact-form-name" name="name" size="30" type="text" value="" />
        <br />
E-mail *<br />
<input class="contact-form-email" id="ContactForm1_contact-form-email" name="email" size="30" type="text" value="" />
        <br />
Message *<br />
<textarea class="contact-form-email-message" cols="25" id="ContactForm1_contact-form-email-message" name="email-message" rows="5"></textarea>
        <input class="contact-form-button contact-form-button-submit" id="ContactForm1_contact-form-submit" type="button" value="Submit" />
        <br />
<div class="contact-form-error-message" id="ContactForm1_contact-form-error-message">
</div>
<div class="contact-form-success-message" id="ContactForm1_contact-form-success-message">
</div>
</form>
</div>
</div>
</div>
8. Now publish your page and you are done.

If you want, you can copy this page link and connect with your Menu bar, Then users easy to get connect with this blogger contact form.

Read more: How to add widget for blogger

This message will send to email address which you registered with blogger. If you have any request ion regarding to this add blogger contact form for blogger.
Read More

Tuesday, January 31, 2017

How To Start A Free Blog On Blogspot Platform

File Under: , 3 comments

Do you want to start a free blog ?  Your answer would be Yes. How can i start it? Starting blog is not hard thing as you think. You know,These days, there are lot of platforms available to start own blog. But blogger/ blogspot is the most popular platform to start a free blog. Because there are more facilities you can get than other platforms and it is very easy to handle it if you are families with it. That's why most of people are using blogger platform to start their blogging. As a newber, I guess you are wonder how to start a blogging in blogger. Today we will guide you to how to start a free blog in blogspot. Just follow our instruction.Lets start this.

How-To-Start-A-Free-Blog

Creating google account for start a blog in blogspot

First of all, you should need a google account to start a blog in blogspot. If you don't have a google account, you can create a google account from here. Just visit that link and create a google account by providing correct information. Once you create a google account, you can use it to lot of google services like gmail. google drive and etc. Now you can sign in to blogger from here.

Guide to start a free blog in blogspot

Now you have a google account.Once you are logged in  you need to press a new blog button top left corner to start a blog or click Start a free blog .You will get a new window. On that window you need to fill with blogger title, blogger address, and blogger template.

Blog title: It will show as your blog name to visitors. Make sure to add it relevant to contents you are going to write.

Blog address: This is your blog identification unique URL. It call blogger address. You will get a subdomain  from blogspot. for example. blog123.blogspot.com. Make sure to choose a good names for your blog. Not your personal name. Other thing is, you can check availability of blog address. So keep changing and see whether its available for you.

Read: Top 5 Ways To Choose Right Domain Name

Blogger template: This is the design of your blog. You can choose good template style for your blog. There are lot of free blogger templates available. Good template always make your blog attractive and decent look. Just choose a one and move on.
After filled blogger title, blogger address and blogger template, you are ready to go. Just press create a blog button. Just wait for few seconds
Now your blog is just created. and there are more things to do.


Start a free blog

How to write blog post to your blog


Even you are create a blog, It doesn't call a blog. I should have good contents. So i will explain, how to write a blog posts to your blog.To start writing your first blogger post, click Create new post link or press New post button. Once you click it, it will load a new post editor panel. So you can keep writing a post in there.

Read: How to Add Custom Web Fonts for Blogger

write blog post to your blog

Write title for your blogger post

Blogger title is very important. You need to have a title for your contents and add content matching title for your article. Make sure to your title is readable for audience and catchy title.I know first article it hard to write. However, you can introduce your self for first article. Keep in mind, article title always describe it's contents.

writing blogger post title

How to Write blogger post body

Once you added article title. You can write your article body. There is two ways to write blogger article body. You can use text composer and html composer by switch it pressing two button on top left corner. If you have a knowledge in HTML, you can use it for wiring article because, there are more advantages to use it. You can use special functions, JavaScript, and special fonts. For beginners can use word processor to make their article decent. lot of options are available.

The Well-Kept Secrets of Writing Quality Web Content 

There is a tool bar to customize your blogger article. Such as, change font style, change font size, change headings, alignments, colors. so you can use those options and make your article quality.
How to add image to blogger article

write blogger post body

Most of are use image in article body. Its good for SEO. So you also can use a matching image for your article. Images can say thousands words. Hence  it's better to include a image to your article and it will be a good experience for audience. Its easy to add it to blogger. First of all make ready your image in some where of your computer folder. There is a option in toolbar call insert image. once you click it. Window will popup with few options showing up. Such as, uploading image from computer, share image link and use webcam to take a picture. So you can choose upload image and upload image to your article. Once it uploaded, it will visible in blogger article. Then you can arrange it as your  needs.

add image to blogger post

How to edit blogger post by setting

I think you might get confused with post setting  options on right side . These are the options which you can use for blogger article. lets go through one by one

Read: Popular Mistakes That Every Bloggers Do

Label:
This is very useful to make categories for your blogger article.

Schedule:
You can publish your article for schedule date.so, you can publish few article in same time

Permalink:
Once you publish your article.,You will get a article link for your blog. Permalink help to
generate link according to your article title.

Location:
This will show your location when publish your article. this is very important for traveler
blogger.

Option:
You can allow some features on there.

Preview button:
There is a preview button option available. This will helps to preview your blogger article while writing.Therefore you can do arrangement before publishing to readers.

Save button:
Save button helps to save your blogger article. for example, if you are not able to finish wring your article same day, You can write half and keep save it for write it again. It will save in blogger without publishing to readers.

Publishing the post:
Once you done with writing article, make sure to check all things are correct without errors. Once you come to that stage, You can publish to your readers by publish button on top right corner.


Finally you published your first article. Now you are done with how to start a free blog. But this is basic things of blogging.

Note: This article for very first beginners guide to start their blog.

Don't think that you are done.There are more to go.We will talk about it next article. until that. You can work hard to keep writing good article for you blog. But make sure to write article for your readers.

Read: Add blogger widget to your blog

As a beginner leaning How to start a free blog is pretty easy. You can start few blogs not only one. But make sure to write it well structured. Write for your readers. then they will come back to read your next article. It helps to get better tanking too. Once you have good visitors, you can start monetize blog and start earning. If you have any question regarding to start a free blog in blogspot, feel free to comment bellow.
Please take a moment to share with social media and subscribe for get new article updates.

Read More

Saturday, December 31, 2016

Animated Happy New Year 2017 Widget for Blogger

File Under: , , , , 13 comments

This is the first bloggertrix article for 2017. Wish you happy new year 2017 for all bloggers. For this new year, most of are like to show new year wishing widget and decorations to your blog. So, This article helps to add animated Happy New Year 2017 Widget for Blogger. Today I'm gonna share unique style Happy New year 2017 widget for your blog.  Its pretty easy to add to your blog. This will work for every blogger templates. I added demo for this widget. You can view it from below demo link before add it to your blog.

If you want to Add  New Year 2017 Fireworks Decoration  you can visit below article.

New Year Decorations :


/Happy-New-Year-2017-Widget


How to add Animated Happy New Year 2017 Widget for Blog


1. Go to Blogger Dashboard > Template
2. Backup your template
3. Click on Edit HTML
4. Find  <body>   and add below code just after it
<div style="position:fixed;top:0;right:40px;z-index:5000">
<img src="https://blogger.googleusercontent.com/img/b/R29vZ2xl/AVvXsEhg9CiUD3Cdu21T1isKPxMqqUcAZvm5Mzf-Ec4h_D5Yl5yiBaUh9McxaP0oET6adF1OA0CpBk9F9OQhS5-0dhTnty2zDz4KN8vEj0LlIhhZO904bfl8ChELxsfSCZKUA608mokRl4gRkv9w/s1600/bloggertrix2017.gif" /></div>

5. Now save your  Template  You are done. If you have any problem related to this Happy New Year 2017 widget. Just leave a comment.I will help you. Hope you can be a successful blogger in this year..

Author Bio: Sohan Jayasinghe is the owner and author of Bloggertrix.com .He has been blogging since 2009 and writing Blogger trix since 2010.If you want to contact him, Just leave a message via contact us page or connect with facebook or twitter
Read More

Tuesday, December 20, 2016

How to Add Animate Christmas Tree Widget for Blogger

File Under: , , , 3 comments

Few more days for biggest Christmas festival. As a blog writer, you can prepare for it by decorate your blog. So, today I'm gonna share new unique tutorial about how to add animate Christmas tree widget for your blog. This will works with every blogger templates.You can check  demo before add it your blog.

You can check our  previous snow effects tricks.

More Christmas Decorations :

Christmas-Tree-widget


How to add Christmas Tree widget for blog


1. Go to Blogger Dashboard > Template
2. Backup your template
3. Click on Edit HTML
4. Find  <body>   and add below code just after it
<div style="position:absolute;top:0;right:40px;">
<img src="https://blogger.googleusercontent.com/img/b/R29vZ2xl/AVvXsEgRF_xKeuJKyQHY6ig7-bYvSoOserYNKn36_d58IV7Z1S_uQkn9yPnIHC1CoYna-xUrVY4DvZUBdCyorryYS-fkgTJROn05yrQmWhBZ-mN77qvQabxxsTLlWZz67QUCTK4_JJAFtPFHDJ8G/s1600/tree.gif" /></div>
<div style="position:absolute;top:240px;right:15px;"><img src="https://blogger.googleusercontent.com/img/b/R29vZ2xl/AVvXsEhglORiYkrZIE98-mI5NL9Swh4qNj9yTV0qUjcQtwJDAr4-6XzrF-I-0HnH31p09BjMspIHQXzVPjd6hfIGFFyEZr_LXFtDXA2-UreI4j4AqS4hY0N-iHgTi9k80W7qohpDALG2xGw0KuGY/s1600/christmas.gif" /></div>
6. Now save your  Template  You are done. If you have any problem related to this Christmas tree widget. Just leave a comment.I will help you.

Author Bio: Sohan Jayasinghe is the owner and author of Bloggertrix.com .He has been blogging since 2009 and writing Blogger trix since 2010.If you want to contact him, Just leave a message via contact us page or connect with facebook or twitter
Read More