In this tutorial, im going to explain about how to add another CSS bar for your Blogger.For this tutorial,i used CSS and HTML. So you can add it to your blog, easily. Follow below steps properly.You can check below link for demo.And check my earlier menu bar post by clicking here
Demo
1. Log in to blogger account and Click drop down.
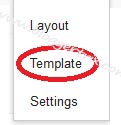
2. Now select "Template" Like Below.
3. Now you can see Live on blog, Click EDIT HTML Button"
4. Now click Proceed button.
5. Find this tag by using Ctrl+F ]]></b:skin>
6. Paste below code Before ]]></b:skin> tag
7. Go to blogger and click Layout
8. Click Add Gadget and select 'HTML/Javascript
9. Paste below code.
10. Now save your HTML/Javascript'.
You are done...
2. Now select "Template" Like Below.
3. Now you can see Live on blog, Click EDIT HTML Button"
4. Now click Proceed button.
5. Find this tag by using Ctrl+F ]]></b:skin>
6. Paste below code Before ]]></b:skin> tag
/* The CSS Code for the menu starts here */
.rhm1{
 width:780px;
 height:64px;
 margin:0 auto;
 background:url(https://blogger.googleusercontent.com/img/b/R29vZ2xl/AVvXsEgA1cMKh3k8SzTjoRIaCEODPPmeUZzMzbm8TYtWOc7lx5hyf9OI-eKb2zWIJg8nvAx7jWFZGmDAXM3NwRF4ZuPz7JazOeU4MeQTZCAAHJ69BNE4tKANhuS_AKY0up35iFKfPDxxPWe5wSU/s1600/rhm1_bg.gif) repeat-x;  }
.rhm1-left{
 background:url(https://blogger.googleusercontent.com/img/b/R29vZ2xl/AVvXsEh0ZT6Ht_F4Bgy6EP_ckrIEx_u6CYzk2qZ-cTSivP1tR2DHeK8Gborh8oZgQS2FauUsFVw7YtfvMNkSbPKTZB1AFyRyTZgdsh7wlvw0NLyH8p0wJ0ixIleXcxHCQZeWFWn2or2NnT7cLU8/s1600/rhm1_l.gif) no-repeat;
 width:15px;
 height:64px;
 float:left;}
.rhm1-right{
 background:url(https://blogger.googleusercontent.com/img/b/R29vZ2xl/AVvXsEhGKaINtye7mfiGQa8WmydKEOX-DgzrnCZJmVDBFxMBcucM-ffQNZdloQpcCdY31j6cvoAsWrgEfpm39mV2jNozcB8wTWjdqzodg3Ak0SMCKXwbHKpgATh379HJJLKZAodU_LUagrlIndE/s1600/rhm1_r.gif) no-repeat;
 width:15px;
 height:64px;
 float:right;}
.rhm1-bg{
 background:url(https://blogger.googleusercontent.com/img/b/R29vZ2xl/AVvXsEgA1cMKh3k8SzTjoRIaCEODPPmeUZzMzbm8TYtWOc7lx5hyf9OI-eKb2zWIJg8nvAx7jWFZGmDAXM3NwRF4ZuPz7JazOeU4MeQTZCAAHJ69BNE4tKANhuS_AKY0up35iFKfPDxxPWe5wSU/s1600/rhm1_bg.gif) repeat-x;
 height:64px;}
.rhm1-bg ul{
 list-style:none;
 margin:0 auto;}
.rhm1-bg li{
 float:left;
 list-style:none;}
.rhm1-bg li a{
 float:left;
 display:block;
 color:#ffe8cc;
 text-decoration:none;
 font:12px 'Lucida Sans', sans-serif;
 font-weight:bold;
 padding:0 0 0 18px;
 height:64px;
 line-height:40px;
 text-align:center;
 cursor:pointer; }
.rhm1-bg li a span{
 float:left;
 display:block;
 padding:0 32px 0 18px;}
.rhm1-bg li.current a{
 color:#fff;
 background:url(https://blogger.googleusercontent.com/img/b/R29vZ2xl/AVvXsEjismepDw4nBnxkW7MJCrrdUjWBQDapR5B1Ne4bcHs5MREqzrcuoQ7jstrp2rC-14QWW-csOkPOV9YSyWwonlPwMFUgkUDAN843excKx3p0D09WR1u-aRWKmvsbgZVge4e1RiftqDbalng/s1600/rhm1_hover_l.gif) no-repeat left 5px;}
.rhm1-bg li.current a span{
 color:#fff;
 background:url(https://blogger.googleusercontent.com/img/b/R29vZ2xl/AVvXsEht3Znu6oXzpESIB1PYFokINNb58jG8t3YkCp7SqsQ-VgnU79A0odscBRMnCb8nzVpmwX08yF83bjqXu6HDyM2cFJdlJAuIvHCpj7jTOX9bRVbZlQaTRZkX9ydykTHmoFrvei8VqX2gjOA/s1600/rhm1_hover_r.gif) no-repeat right 5px;}
.rhm1-bg li a:hover{
 color:#fff;
 background:url(https://blogger.googleusercontent.com/img/b/R29vZ2xl/AVvXsEjismepDw4nBnxkW7MJCrrdUjWBQDapR5B1Ne4bcHs5MREqzrcuoQ7jstrp2rC-14QWW-csOkPOV9YSyWwonlPwMFUgkUDAN843excKx3p0D09WR1u-aRWKmvsbgZVge4e1RiftqDbalng/s1600/rhm1_hover_l.gif) no-repeat left 5px;}
.rhm1-bg li a:hover span{
 color:#ffffff;
 background:url(https://blogger.googleusercontent.com/img/b/R29vZ2xl/AVvXsEht3Znu6oXzpESIB1PYFokINNb58jG8t3YkCp7SqsQ-VgnU79A0odscBRMnCb8nzVpmwX08yF83bjqXu6HDyM2cFJdlJAuIvHCpj7jTOX9bRVbZlQaTRZkX9ydykTHmoFrvei8VqX2gjOA/s1600/rhm1_hover_r.gif) no-repeat right 5px;}
7. Go to blogger and click Layout
8. Click Add Gadget and select 'HTML/Javascript
9. Paste below code.
<!--bloggertrix.comMenuBar Starts-->
<div class="rhm1">
<div class="rhm1-right"></div>
<div class="rhm1-left"></div>
<div class="rhm1-bg">
<ul>
 <li class="current"><a href="#"><span>Home</span></a></li>
 <li><a href="#"><span>About Us</span></a></li>
 <li><a href="#"><span>Services</span></a></li>
 <li><a href="#"><span>Products</span></a></li>
 <li><a href="http://www.bloggertrix.com/"><span>Add This</span></a></li>
</ul>
</div>
</div>
10. Now save your HTML/Javascript'.
You are done...


You have a very nice blog Soha. I have a self hosted wordpress site and can you help with with regards to design of it? Thank you!
ReplyDeleteLove this menu bar and it works great. Even love the colour but I really need to change the colour a bit to match my blog. Is there any way to do this?
ReplyDelete@Caroline St Clare
ReplyDeleteWhich color do you want?
@Balaji G S,
ReplyDeleteim a blogger template designer, if you want to design blogger template. i can help :)
@Bloggertrix
ReplyDeleteHi, thanks for getting back to me. I really want to try out 2 different colors to see which looks best. First is #c6d22d, and the other is #668a1f. If it'll take too much time, don't worry cos I will need to change to a drop down menu soon.
Hi, thanks for your reply. Not sure if I sent my reply already. But there are two colours I want to try, one in #c6d22d and another in #668a1f. Don't worry if it's a big job as I want to change to a drop down menu in the near future.
ReplyDelete@Caroline St Clare
ReplyDeleteSorry.
Its not possible to change to that colors.
you can try other drop down menu-bars.
thanks..
Good blog! I really love how it is easy on my eyes and the data are well written. I'm wondering how I could be notified whenever a new post has been made. I've subscribed to your feed which must do the trick! Have a great day!
ReplyDelete