Showing posts with label Social Media. Show all posts

Monday, February 6, 2017

How To Add an Instagram Widget in a Blogger Blog

File Under: , , 3 comments

Instagram is a most popular picture and photo sharing network application for smartphones.It's also belong to social networking platform like Facebook, Twitter, and Flicker.You can register as a user in Instagram. When you post a photo or video on Instagram, It will display on your profile.So, others can follow you, like on your photos and comment on photos.Same thing also you can do, comment and like other photos. In instagram, there are 200 millions  active users use a month.

Read:  Best blogger Widgets 2017 for Blogger

Adding Instagram widget to blogger, you can get more facilities to your blog. Because it will show your photos in profile pages. When ever you go some where else, you can take a photo and share it on Instagram. There are more filters you can add to photos. This Instagram widget, specially design for blogger and it will show your images on blogger even they are not your follower.

Add-Instagram-Widget-Blogger
By adding this Instagram widget for blogger ,You can increase your follower. Once they visit your blog and if your shared photos are interesting, they will follow you. And you have to share photos according to your blog content,for example if you doing  food  making blog, you can share about foods.It will easy to get more followers in Instagram.

Today, this article will explain, how to add  Instagram widget to your blog site with step by step. By using this blogger widget  you can customize Instagram widget appearance like background color, font color and how to show this widget on blogger.So just follow below steps.

How to Add An Instagram Widget in Blogger


1: You need to visit this site to get Instagram widget  http://www.intagme.com/

2: Type Instagram  username first

3: You can choose slideshow as Widget type

4: Thumbnail Size 100

5: You can select Photo Border  If you want a border to photos

6: You can choose Background Color match to your template color with color picker

7: If you want to add sharing button select Yes
Instagram-Widget-Blogger
      Note: Once yo done, click preview and check your Instagram widget appearance.

8: Once you are done click Get Code and copy it.

9: Now just login to your blogger account https://www.blogger.com

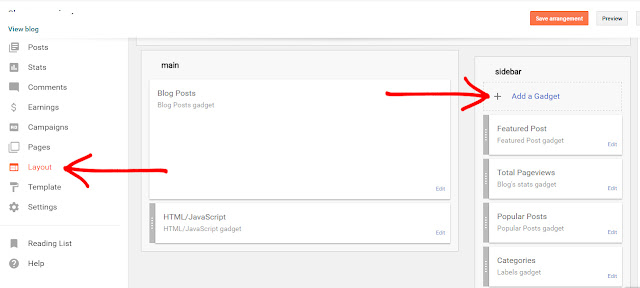
10: Go to layout on left side bar on blogger dashboard

add-Widget-Blogger


11: Click Add Gadget,  Select HTML/JavaScript gadget on popup window.

add-Widget-Blogger

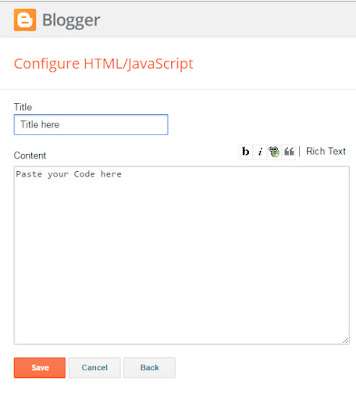
12: Paste the instagram widget code that you copied from intagme website and click Save


add-Widget-Blogger-instragram
13: Now you can drag the widget where you want to keep and click Save Arrangement

You are done

I hope you added Instagram widget to your blog.Hence, you can share photos and videos as i said above. To change color or appearance of this Instagram widget, you can go that site and edit it as your need.

Read: Best Blogger Gadgets 2017 for Blogger

Once you added Instagram widget to blogger, you can ask your visitors to follow you. Before do it, just make sure to add few photos to your profile and profile photos as well.Then they will get trust about you profile and follow you.

If you have a question about this Instagram widget for blogger gadget, You can comment below. If this article helps you, just spend moment share with Facebook twitter and follow us on Facebook and Twitter
Read More

Saturday, February 14, 2015

Top Marketing Tips for Instagram to Success Your Online Business

File Under: , 15 comments

Although being relatively young in the social networking scene, Instagram has quickly gained popularity and now boasts 300 million active monthly users. This number is only expected to grow as smartphones take over the global market. Instagram's rapid growth is due to the following reasons:
1.   It's easy and fun - there are no complicated help topics or FAQs needed for someone to get started
      with Instagram. The learning curve is manageable even for people who are not technologically
      savvy. Better yet, the ability to apply filters, borders and other special effects allows people with
      little artistic ability to drastically change their images without the need for expensive software.

2.   It's free – All of the filters and other bells and whistles are provided completely free of charge.

3.   It's social – Instagram allows you to capture a moment in time and then share it with your
      followers instantaneously. While you can do this on Facebook, Instagram allows you to apply
      different effects to capture not only the actual event, but the feeling associated with that
      particular  moment.

4.   It's visual – visual content is more in-demand than ever before and Instagram provides a
      completely visual platform.

Tips-for-Instagram

 Instagram Is An Important Content Marketing Tools

All of these reasons combined has allowed Instagram to become not only one of the biggest social networks but also has one of the highest engagement rates as well. Around 70 percent of Instagram users visit the site at least once a day with 35 percent visiting it multiple times a day. If you're just starting out with Instagram, you might not know exactly how to approach it. The following tips can help you get started and you'll soon be well on your way to being an Instagram master.

Tell a story about some important thing


While Instagram might be a visual platform, you don't need to sell visual products to join the service. At the end of the day, what will bring people to your profile is the story you tell through your images. These pictures can be of your product, customer or even your brand personality. The important part is to ensure all of your images all communicate a message that will also resonate with your audience. The best way to do this is to study up on your competitors and see what they are doing. Then ask yourself how you can differentiate yourself from them. More importantly, make sure your photos provide value to your followers.

Create own awesome contents

Just because Instagram might allow lower resolution photos doesn't mean you should use them. Use high-quality images and keep the filter use to a minimum as much as possible. If you can, use a third-party editing app instead to enhance your images before submitting them to Instagram. While images are the bread and butter of Instagram, don't underestimate the power of a good caption to your photos. They can be funny or inspirational, but above all they should encourage engagement. If you want to encourage even more interaction, as of 2013 Instagram now allows short 15-second videos. Brands have quickly adopted this new feature and have been very successful as 40 percent of the most shared Instagram videos are from brands.

Engaged with other users

Like other social networks, you need to proactively interact with other users in order to gain followers. While it might seem strange to simply comment on users who don't follow you, this is the best way to reach influences. For best results follow these steps:
  • Find an user with a high follower count in your niche
  • Like five of their photos
  • Comment on three of their photos
When commenting, don't just type in vague niceties. Instead, leave a thoughtful comment that adds value and can potentially start a conversation. On your own profile, be sure to add relevant hashtags to your posts and respond to comments.

Grow your followers

Your follower count won't increase overnight, but once you've figured out the images, text and hashtags that work best for you, you'll be able to attract more people to your profile.

Ivan Serrano is a journalist living in Northern California. He prefers to write about social media, marketing and small business. Ivan occasionally writes on the nationaldebtrelief.com blog, he loves practicing photography and his favorite thing to do is watch his favorite sports teams.

Author Bio: Sohan Jayasinghe is the owner and author of Bloggertrix.com .He has been blogging since 2009 and writing Blogger trix since 2010.If you want to contact him, Just leave a message via contact us page or connect with facebook or twitter
Read More

Sunday, September 8, 2013

Sky Blue Blogger Navigation Bar With Social Icons

File Under: , , 5 comments

Navigation bar is very important  part of your website.Because it helps visitors to navigate our website and make easy to  them find relevant content of our site.Therefore we have to use attractive blogger navigation bar for our blogs.Its not very hard job to find attractive blogger navigation bar. Bloggertrix.com provided lot of navigation's bars.Just check Menu Bars under categories.

Using CSS we can design more attractive blogger navigation bars.CSS language is very easy to learn and very flexible.We can apply CSS to any webpages.There have ton of tutorials about CSS languages.You can copy paste any code and modify blogger navigation bar to suit your needs.

Today I'm gonna explain about how to add Sky blue blogger navigation bar with social icons.Pretty huh? Will see how can we do it.Actually i want to say.This blogger navigation bar helps you to add social profiles links as well.However just have a look demo page.You can get a idea about it very well.Let see, how to add this for blogger.

Sky+Blue+Blogger+Navigation+Bar


Some of stylish navigation bars.
           Css Icon Hover Effect Navigation Bar For Blogger
           Css3 Dark Blue Navigation Bar For Blogger
           Css3 Navigation Bar With Google Custom Search Box
           Get All Navigation bars

How to add Sky Blue Blogger Navigation Bar With Social Icons


1. Go to Blogger Dashboard > Template
2. Backup your template
3. Click on Edit HTML
4. Find  ]]></b:skin>   and add below code just above it

/* The CSS Code for the menu starts here bloggertrix.com
#topMenu{border:1px solid #7DF; border-radius:6px; background:#00AAEB; background:url(https://blogger.googleusercontent.com/img/b/R29vZ2xl/AVvXsEgnVxjx2WMq8D6oyfvbPbF90ZTAT89EOzrJWo0KHRdxEdv-lFpbcA3kJKUMUgIybmRwoj_lBN0kouj5kLYfmexREOEv5Vy3Jmjg_m_nmAyi4ROPIjQnNh64bJEPO7mmZe5McO3EJI34o04/s1600/bk_topmenu.png) 100% 0 no-repeat,-moz-linear-gradient(top, #00c1fa 0%,#0094dd 100%); /* FF3.6+*/background:url(https://blogger.googleusercontent.com/img/b/R29vZ2xl/AVvXsEgnVxjx2WMq8D6oyfvbPbF90ZTAT89EOzrJWo0KHRdxEdv-lFpbcA3kJKUMUgIybmRwoj_lBN0kouj5kLYfmexREOEv5Vy3Jmjg_m_nmAyi4ROPIjQnNh64bJEPO7mmZe5McO3EJI34o04/s1600/bk_topmenu.png) 100% 0 no-repeat,-webkit-gradient(linear,left top,left bottom,color-stop(0%,#00c1fa),color-stop(100%,#0094dd)); /* Chrome,Safari4+*/background:url(https://blogger.googleusercontent.com/img/b/R29vZ2xl/AVvXsEgnVxjx2WMq8D6oyfvbPbF90ZTAT89EOzrJWo0KHRdxEdv-lFpbcA3kJKUMUgIybmRwoj_lBN0kouj5kLYfmexREOEv5Vy3Jmjg_m_nmAyi4ROPIjQnNh64bJEPO7mmZe5McO3EJI34o04/s1600/bk_topmenu.png) 100% 0 no-repeat,-webkit-linear-gradient(top, #00c1fa 0%,#0094dd 100%); /* Chrome10+,Safari5.1+*/background:url(https://blogger.googleusercontent.com/img/b/R29vZ2xl/AVvXsEgnVxjx2WMq8D6oyfvbPbF90ZTAT89EOzrJWo0KHRdxEdv-lFpbcA3kJKUMUgIybmRwoj_lBN0kouj5kLYfmexREOEv5Vy3Jmjg_m_nmAyi4ROPIjQnNh64bJEPO7mmZe5McO3EJI34o04/s1600/bk_topmenu.png) 100% 0 no-repeat,-o-linear-gradient(top, #00c1fa 0%,#0094dd 100%); /* Opera 11.10+*/background:url(https://blogger.googleusercontent.com/img/b/R29vZ2xl/AVvXsEgnVxjx2WMq8D6oyfvbPbF90ZTAT89EOzrJWo0KHRdxEdv-lFpbcA3kJKUMUgIybmRwoj_lBN0kouj5kLYfmexREOEv5Vy3Jmjg_m_nmAyi4ROPIjQnNh64bJEPO7mmZe5McO3EJI34o04/s1600/bk_topmenu.png) 100% 0 no-repeat,-ms-linear-gradient(top, #00c1fa 0%,#0094dd 100%); /* IE10+*/background:url(https://blogger.googleusercontent.com/img/b/R29vZ2xl/AVvXsEgnVxjx2WMq8D6oyfvbPbF90ZTAT89EOzrJWo0KHRdxEdv-lFpbcA3kJKUMUgIybmRwoj_lBN0kouj5kLYfmexREOEv5Vy3Jmjg_m_nmAyi4ROPIjQnNh64bJEPO7mmZe5McO3EJI34o04/s1600/bk_topmenu.png) 100% 0 no-repeat,linear-gradient(to bottom, #00c1fa 0%,#0094dd 100%); /* W3C */background:url(https://blogger.googleusercontent.com/img/b/R29vZ2xl/AVvXsEgnVxjx2WMq8D6oyfvbPbF90ZTAT89EOzrJWo0KHRdxEdv-lFpbcA3kJKUMUgIybmRwoj_lBN0kouj5kLYfmexREOEv5Vy3Jmjg_m_nmAyi4ROPIjQnNh64bJEPO7mmZe5McO3EJI34o04/s1600/bk_topmenu.png) 100% 0 no-repeat,filter:progid:DXImageTransform.Microsoft.gradient( startColorstr='#00c1fa',endColorstr='#0094dd',GradientType=0 ); /* IE6-9 */}
#topMenu ul.sf-menu li{border-right:1px solid #80CFFF}
#topMenu ul.sf-menu li a{color:#CBEBFE; text-shadow:#008FE8 1px 1px}
#topMenu ul.sf-menu li li a{color:#CBEBFE}
#topMenu ul.sf-menu li a:hover{color:#FFF}
#topMenu ul.sf-menu li li{}
#socialIcons li{border-left:1px solid #2BC9FD}
#topMenu{width:960px; height:46px; position:absolute; top:125px; left:0; -webkit-box-shadow:0 6px 6px -6px #999; -moz-box-shadow:0 6px 6px -6px #999; box-shadow:0 6px 6px -6px #999}
#topMenu ul.sf-menu li{float:left; padding:0 15px; font-size:12px;list-style: none;margin-left: -10px;}
#topMenu ul.sf-menu li a{text-decoration:none; text-transform:uppercase; font-weight:bold; padding:4px 0}
#topMenu ul.sf-menu li a:hover{text-shadow:none}
#topMenu ul.sf-menu li li{padding:0; border:none}
#topMenu ul.sf-menu li li a{font-weight:normal; padding:4px 12px}

#socialIcons{position:absolute; right:0;  margin:0 0}
#socialIcons li{float:left; padding:0 10px;list-style: none;}
#socialIcons li a{display:block; text-indent:-9999px; width:24px; height:19px}
#socialIcons li a:hover{background-position:0 -19px}
#socialIcons .twitter{background:url(https://blogger.googleusercontent.com/img/b/R29vZ2xl/AVvXsEj9hMqEEVCP7W9sWM9A7Ma6Uf9jEx-Na0b0nPs52t9yDW0nS5fCENmMM1Kott0Xk6x2KkoauA6mlZA-0TsnuGPZ319ODuu9m31roNKzXds_szw69Xy73jdNt5MdQmm-OO89c6hkxqqmzyo/s1600/ico_twitter.png) 0 0 no-repeat}
#socialIcons .facebook{background:url(https://blogger.googleusercontent.com/img/b/R29vZ2xl/AVvXsEg8f0loa-h4m_KlR-l8FoqQJE6SW_OD_gcw9DB4vobIJr_hgZhhUpmSzZVwV3tl0V8Ta0OTAT_CUiFgigagdBqYSTAcMxcGAuDe9HFNLkMcAURhmsCLr0fYWj6p_0lGZEESk7WxXAVYook/s1600/ico_facebook.png) 0 0 no-repeat}
#socialIcons .flickr{background:url(https://blogger.googleusercontent.com/img/b/R29vZ2xl/AVvXsEj2I6y_ClRPnDBjb0fUQ-YCMPOrIlpkxjRURZ0SAx6seCN-41r7KQaCgNM_yA1nPYK7XkL_80ttUAPVVFuM3dDzxeSOzKiH88lX0i6SS9Cz8sVGTFsk4NndRika5J4h_pZA2kInbvIHorI/s1600/ico_flickr.png) 0 0 no-repeat}
#socialIcons .linkedin{background:url(https://blogger.googleusercontent.com/img/b/R29vZ2xl/AVvXsEhwrSdMZV_4gvB61v2Wvo11U8bRvoZ5pBw6YSXSJ5MDZt_h4aUddOnLxbcT0F_oHYLhddIg5Iu_EzJOWIVrB0OpXm2dbQi_FU_ZFKSbJhGvuKANbqXhcVlF342392ahIqgJtOplhsmJU0Y/s1600/ico_linkedin.png) 0 0 no-repeat}
#socialIcons .vimeo{background:url(https://blogger.googleusercontent.com/img/b/R29vZ2xl/AVvXsEh1Nfo-hNUn5MIYrTIxPtxs1pJ5tyYB9efVVXbjo3fC9rShP6WyGHQt7Mk3kXAmkMKGT3WiS3Rom7BaES_E1Q2q-mZf-YS9fUC_TKV-Wb33pCQ_Oue_TBWiGZOTmMfv3TWCBUCdy2TmZcw/s1600/ico_vimeo.png) 0 0 no-repeat}
#socialIcons .googleplus{background:url(https://blogger.googleusercontent.com/img/b/R29vZ2xl/AVvXsEjlzWTVbzVciiej7dInoZlI44lERG4HUgFkENl8hTtbbL9skLtH-99Mbbtj4CLHeuysvBCAdsVqfpeJHhrDIbbUnGSul59nOwvJ9wI-w5E-lVnsKwAMzq2N9GE5Fzo7lQ3JQrZ1d1tKcOA/s1600/ico_google.png) 0 0 no-repeat}
#socialIcons .rss{background:url(https://blogger.googleusercontent.com/img/b/R29vZ2xl/AVvXsEgcasDa82YMGzfqowsbHvQIIzcsphx6D-JwRLFEJC1PWAdCJJof-I6B5GQWzg-dgAMPfRlPJxMePV2wnv48DGExV_FgMCAiHuvn5zErQ9DnwUA_OpJxtdmbBRKWHLxwmQ4c1UH64d83e2g/s1600/ico_rss.png) 0 0 no-repeat}

5. Go to blogger Layout
6. Click Add Gadget and select 'HTML/Javascript'
7. Paste below code.

<div id="topMenu">
<ul class="sf-menu sf-js-enabled sf-shadow" id="menu-topmenu">
<li><a href="#">Home</a></li>
<li><a href="#">Services</a></li>
<li><a href="#">Portfolio</a></li>
<li><a href="#">Blog</a></li>
<li><a href="http://www.bloggertrix.com/">Contact Us</a></li>
</ul>

<ul id="socialIcons">
<li><a class="twitter tooltip" href="http://www.twitter.com/bloggertrix"  target="_blank">Follow us on Twitter</a></li>
<li><a class="facebook tooltip" href="http://www.facebook.com/bloggertrix" target="_blank">Join us on Facebook</a></li>
<li><a class="linkedin tooltip" href="http://www.linkedin.com/" target="_blank">Join us on LinkedIn</a></li>
<li><a class="googleplus tooltip" href="https://plus.google.com/" target="_blank">Join us on Google+</a></li>
<li><a class="flickr tooltip" href="http://www.flickr.com/" target="_blank">Watch us on Flickr</a></li>
<li><a class="vimeo tooltip" href="https://vimeo.com/" target="_blank">Watch us on Vimeo</a></li>
<li><a class="rss tooltip" href="http://bloggertrix.com/feeds/posts/default"  target="_blank">RSS Feeds</a></li>
</ul>
</div>
Replace # with your links. and social profile as well.

8. Now save your HTML/Javascript'.

You are done. If you have any problem related to this Sky Blue Blogger Navigation Bar. Just leave a comment.I will help to you.
Read More

Saturday, August 24, 2013

Stylish Social Media Widget with Search Box

File Under: , , , 4 comments

Social media is very important in these days.In this tutorial im gonna explain,how to add social media widget with search box for blogger.Social media always helps to bring quality and fast traffic to your blog.All bloggers must use social medias sites like Facebook, Twitter,Linkdin.By sing this social media widget, you can link with your social profiles.And other thing is, this widget include with search box too. So, you can save your blogger side bar space by using this 2 in 1 widget.In this  post  im gonna  explain  how to add social media  widget with light search box for your blog. Im using css3 and HTML for this widget. you can take a look at in demo page.

Stylish+Social+Media+Widget+Search+Box

1. Go to Blogger Dashboard > Layout
2. Click Add Gadget and select 'HTML/Javascript'
3. Paste below code.


<style>
#btrixwidget{width:307px;
padding:0 0 5px 0;
border:1px solid black;}
#btrix-searchbox {
    border-radius: 5px;
    background: URL(https://blogger.googleusercontent.com/img/b/R29vZ2xl/AVvXsEhaYIfsBR7OKMwA67bc6YUPFPHyC9NQCjVhFgunGtdf03XlueS2PngPuWmKplejUXXe8RfILra-GCjrv2m_gIq6ElypvA3alUeGlX7kY9Jry4-5yXSBqoTq-_dvFJ5YLHnecYWZ-k5nGO1j/s1600/blue.png) no-repeat scroll center center transparent;
    width: 307px;height: 50px;disaply: block;}
form#btrix-searchform {
    display: block;padding: 9px 16px; margin: 0;}
 form#btrix-searchform #s {
    padding-left: 24px !important;padding: 7.5px;margin: 0;width: 198px;
    font-size: 16px;font-family: georgia;font-style: italic;color: #666666;vertical-align: top; border: none;background: transparent;}
 form#btrix-searchform
#sbutton {margin: 0;padding: 0;height: 40px;width: 74px;vertical-align: top;
    border: none;background: transparent;}
</style>
<div id="btrixwidget"><center>
<a href="http://twitter.com/bloggertrix" target="_blank" wrc_done="true"><img src="https://blogger.googleusercontent.com/img/b/R29vZ2xl/AVvXsEidt68o9W-rAnmAjc_1msmXYENzYQ2lKsTl9DeaCJ0-Lcv_Twwg7obIv_Zi20rfQRBILMTVQkvnqKgh4sUzwVACglujfaqBZwwqg_9-kKS8R8d7ErgSVdmG1_Fg0sT3gVxIXiHC0VpN9hc/s1600/btrix-twitter.png" alt="" title="twitter" width="62" height="78" class="alignnone size-full wp-image-6249"></a>

<a href="http://www.facebook.com/bloggertrix" target="_blank" wrc_done="true"><img src="https://blogger.googleusercontent.com/img/b/R29vZ2xl/AVvXsEgO9RkKx95iA1_TJPKY8QuKCZttMc3gF18_1-LRLGEW6TOdD6RPaHd1NwMGGlPQTAbhsenhT2EC1XEgVdd-F1UAU0_5Uzy4pjxERrm8Jrn3x6KozB1TJSjavnof0XDhEiYNb_ScEcbxRuY/s1600/btrix-facebook.png" alt="" title="facebook" width="62" height="78" class="alignnone size-full wp-image-6248"></a>

<a href="http://feeds.feedburner.com/bloggertrix" target="_blank" wrc_done="true"><img src="https://blogger.googleusercontent.com/img/b/R29vZ2xl/AVvXsEhDgWDgnX6ckWlvF0ZYKdGCuFfbVKV_zQ6MwPF7U2v07F17Etkizl46aRjp9Wnb9p9VVJIOUsoB2NaMR7K-EzFI-xnXZN2BVxuK76ED1kTP7nvddINLxDbeJ6pIgzEnT2rwI6IRcWhOWug/s1600/btrix-rss.png" alt="" title="rss" width="62" height="78" class="alignnone size-full wp-image-6251"></a>

<a href="http://au.linkedin.com/username" target="_blank" wrc_done="true"><img src="https://blogger.googleusercontent.com/img/b/R29vZ2xl/AVvXsEjGtED51H8L7umH-y-K4G-lPL0xu5-U-1gyb2s_7hyphenhyphenWZnfURwSQcaRy13t3fA3bhslk-FpZeoy1uS2QqnLAL-IGMZugneCj4mTKSK65leGVc5xV1har3PXzScFff0N2x22AyOiZLFkelZU/s1600/btrix-linkedin.png" alt="" title="linkedin" width="62" height="78" class="alignnone size-full wp-image-6250"></a>

<div id="btrix-searchbox">
    <form id="btrix-searchform" action="/search" method="get">
        <input type="text" id="s" name="q" value="Search..." onfocus='if (this.value == "Search...") {this.value = ""}'
        onblur='if (this.value == "") {this.value = "Search...";}' />
        <input type="image" src="http://img1.blogblog.com/img/blank.gif" id="sbutton"
        />
    </form>
</div>
</center>
</div>

Replace bloggertrix with your twitter profile
Replace bloggertrix with your facebook profile
Replace bloggertrix with your feedburner profile
Replace username with your linkedin profile

4. Now save your HTML/Javascript'.

You are done. If you have any problem related to this Stylish Social Media Widget. Just leave a comment.I will help to you.
Read More

Thursday, August 1, 2013

Dynamic Floating Social Bookmark Widget for Blogger

File Under: , , 22 comments

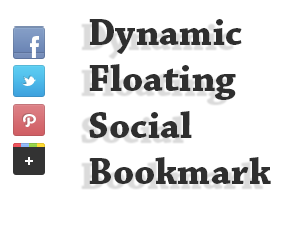
Social media networks always great resource to get traffic.Every bloggers love to get huge traffic for their blog.Therefore we have to be active in social medias site.Because we need  get lot of followers and friends.In this tutorial im gonna explain How to add Dynamic Floating Social Bookmark Widget for Blogger.It helps to increase your followers and friends.This Floating Social Bookmark Widget shows on every pages in bloggers. You can link your social media profile Facebook, Twitter Pinterest and Google plus. It will help to get new followers and friends to your profile.Check below link for demo.
Floating-Social-Bookmark


You may like these articles
How to Add Fixed Social Media Sidebar for Blogger
Awesome 8 tips to Increase Google Plus Followers
Smooth Sliding Social Media Widget For Blogger
Extracting Hover Style Social Media Widget for Blogger

How to Add Unique Rss Subscribe Widget For blogger


1. Log in to blogger account and Click drop down.
blog-post-option
2. Now select "Template"

3. Find this tag by using Ctrl+F   </head>
    Note: First click on template code (anywhere of code), After that press  Ctrl+F

4. Paste below code before </head> tag

<script src='http://ajax.googleapis.com/ajax/libs/jquery/1.3.2/jquery.min.js' type='text/javascript'/> 
<script language='javascript'> 
var name = &quot;#floatMenu&quot;;
var menuYloc = null;
$(document).ready(function(){menuYloc = 
parseInt($(name).css(&quot;top&quot;).substring(0,$(name).css 
(&quot;top&quot;).indexOf(&quot;px&quot;)))
$(window).scroll(function () { offset = menuYloc+$(document).scrollTop()+&quot;px&quot;;$(name).animate({top:offset},{duration:1000,queue:false});});}); 
#floatMenu {
position:absolute;top:150px;float:left;width:45px;}
#floatMenu ul {list-style: none;}
#floatMenu ul li a {-webkit-transform:scale(0.6);-moz-transform:scale(0.6);-o-transform:scale(0.6);-webkit-transition-duration: 0.5s;-moz-transition-duration: 0.5s;-o-transition-duration: 0.5s;opacity: 0.8;}
#floatMenu ul li a:hover {-webkit-transform:scale(1);-moz-transform:scale(1);-o-transform:scale(1);opacity: 1;}
</style>


5. Now again Find this tag by using Ctrl+F   </body>
    Note: First click on template code (anywhere of code), After that press  Ctrl+F

6. Paste below code before </body> tag

<div id='floatMenu'>
<ul>
<li><a href='http://facebook.com/bloggertrix' target='_blank'><img border='0' src='https://blogger.googleusercontent.com/img/b/R29vZ2xl/AVvXsEhqwR17TGn5Yl6scrKBKQQcdKREZwtewY9RKxiBY7_jbX6jAh5DAp38UAhXWgqKdP7JOaggc_CMMKbzHfsha8X7DJnmsRRmNRNgFFGjyJw39DwfGliSBz1TRTHTGoWrxWjXFIFdA_tqTqs/s1600/btrix-facebook.png' style='margin-bottom: 3px;' title='Follow Me On  Facebook'/></a></li>
<li><a href='http://twitter.com/bloggertrix' target='_blank'><img border='0' src='https://blogger.googleusercontent.com/img/b/R29vZ2xl/AVvXsEi8K2psjJGZB4ATwBfJYAyR6MyN3W2sD_phBXDcx4poLp3jrwJLa0yjr5Qv1Pys6MiEURy7sCVGwPx09AyUIcBgVupqivenpgbnz4UkFn33u6N03WeQVS2V9PFUStyj45xVhaOgFt4g_zE/s1600/btrix-twitter.png' style='margin-bottom: 3px;' title='Follow Me On  Twitter'/></a></li>
<li><a href='http://pinterest.com/bloggertrix/' target='_blank'><img border='0' src='https://blogger.googleusercontent.com/img/b/R29vZ2xl/AVvXsEgK-RfZdj-qITGC2OAKBuEeZKPzx2XftqghzDxaWqBE_jKUzDwdNGnonEy9CcCQ23ctRQ_L2tyXLTiVoyxUvz19M9toNBhyphenhyphenholFzeSp824HX4ij5FrzSC4mDlaKemzBTwxs98nW27YKZWs/s1600/btrix-pinterest.png' style='margin-bottom: 3px;' title='Follow Me On  Pinterest'/></a></li>
<li><a href='https://plus.google.com/107955298793879607964' target='_blank'><img border='0' src='https://blogger.googleusercontent.com/img/b/R29vZ2xl/AVvXsEh0uZjN_lXeXOKkle3Q8m7tCVze4FMX03NUm_H6WQdM2ADoVbvPjDu2DXYgExzOAJ2VU38NPFmaTvGkBPevcw4ESDW19dtGQ8Q01xcWhWOx028n9eBaHfElfTNhYgS_MPGZGtdgfnHYjA8/s1600/btrix-googleplus.png' style='margin-bottom: 3px;' title='Add Me your Circle'/></a></li>
</ul></div>

Replace bloggertrix with your Facebook username
Replace bloggertrix with your Twitter Username
Replace bloggertrix with your Pinterest Username
Replace 107955298793879607964 with your Google plus id Username

7. Now click Save Template You are done...
If you need any help for Dynamic Floating Social Bookmark Widget, Just leave a comment.
Read More